This one’s a bit hard to explain in words, but it’s really cool when you get into it.
Here’s another header hack / tutorial for you.
(Check out some more header related tutorials: Click here)
It’s quite a bit of frustrating work to make it, but for you, it’s not too hard to do… because I’ve already done it. haha
Here’s what we’re aiming for.

Full disclosure / Credit : A friend of mine asked me if I could make a header that looks like this: https://diviagency.divilife.site/
So I checked it out. I liked how the header has a lot of space for extra info and a CTA button, but I didn’t like how the text wrapped inconsistently, and the search field didn’t appear where I would have intuitively thought it would. (See below)


So I decided to make a post on building a similar layout. I don’t know how that header was built, but my tutorial was done totally independently, and probably not similar in build method at all. (I didn’t even inspect the inspiration header, so I don’t know how it was built)
Anyways, here we go.
the video
The materials
1. A child theme – Yes, you should always use a child theme. Come on, we’re past this in 2019.
– Click me to get a Divi child theme (this child theme will take care of the next item on the list.)
– Click me to see why you ALWAYS need a child theme. (and in this case, you’re gonna have to use one anyways)
2. A way to insert content in the header. – You can either add html yourself, or add a divi row via this method here. (Click me)
3. These files
Inside you’ll find:
– header-stackedheader.php
– stackedheader.css
(If you’re on Windows there might be some other empty folders names MACOS or whatever, you can disregard them)
and off we go!
The steps
Step 0. Make the extra content that’ll go in the header
You can use html, and insert it directly, or you can use the layout shortcode by using the method from item 2 above. (or just watch the video)

Step 1. Change the file name
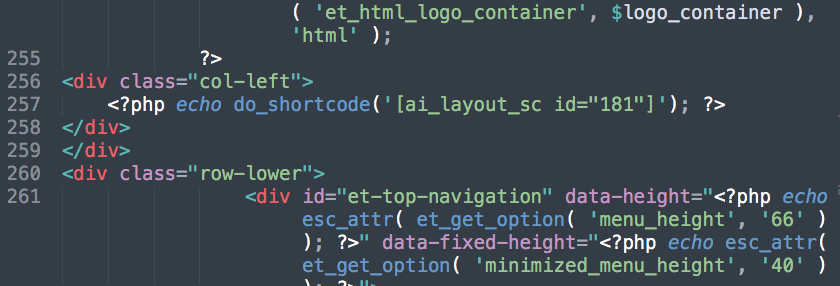
You’re going to have to change header-stackedheader.php to header.php and drop that into your child theme. (Overwrite the existing header.php file)
Step 2. Add the extra content
Go to line 257 in the header file (the one you just downloaded and changed the filename) and either
– change the shortcode to what you need it to be or
– add html (or php) as you see fit.

And now
Step 3. Add the styling
Stackedheader.css has all the css you need to make the header look good. Watch the video to get a couple of tips on customizing the styles. Copy the css and drop that into your child theme’s css file (/css/main.css if you’re using my child theme) or theme options.
And you’re done.
It’s a bit complicated, but it’s worth it if you want a complex layout that works well.
[sc name=”learn css”]
Photo by Heather Gill on Unsplash


Abhiraj Gupta says:
I was exactly looking for this tutorial. Refer by a fb group friend. Many many thanks for this nice tutorial 🙂
PK says:
My pleasure! Thanks for the comment!
Al says:
Thanks for the tutorial! It works really great. Only thing is it doesn’t look very good on mobile. I set up blurbs in the extra space and made them not visible on mobile. But then my logo is on the upper row and the hamburger menu is on the lower row. Any suggestions how to fix this?
PK says:
Hi, I’d have to see it to help you on that.
The CSS I included with the header has just basic responsive behavior, so to get exactly what you’re aiming for I’d need to know what you want in detail.
Feel free to email me or post the URL here.
cLAUDIA says:
Thanks! this is a great tutorial! Love it!
PK says:
Thank you for the kind words!