
Here’s something different. haha
Usually I post things that help developers or designers find solutions to their page building, but this one is different in that it’s just really cool.
How to add confetti to the background of a landing page
I don’t just think about random “cool” things to do. Whenever there’s a cool thing that’s doable, there should be a problem that it solves. So what do we do with this cool snippet?
We can use it as background for a landing page when there’s a promotion. Right? That makes contextual sense, right?
Come to think of it, there are a lot of uses that could justify having something like this: coupons, promotions, registers, email redirections, and order completions. So let’s give it a go.
The Video Tutorial
The tutorial starts at 1:25 after I plug my upcoming course.
Skip to 5:10 ish to see what the confetti would look like.
I’ll give you two different styles of the confetti, gingko leaf style circular sectors (the original) and boxes (like real confetti, and forked by me).
Scroll past the snippets to get to the usage and customizations.
Here’s the original
circular sector shaped confetti
Copy the following into a code module:
<canvas id="canvas"></canvas>
<style>
canvas {
 position: absolute;
 bottom: 0;
 left: 0;
 width: 100%;
}
</style>
<script>
const canvasEl = document.querySelector('#canvas');

const w = canvasEl.width = window.innerWidth;
const h = canvasEl.height = window.innerHeight * 2;

function loop() {
 requestAnimationFrame(loop);
 ctx.clearRect(0,0,w,h);

 confs.forEach((conf) => {
 conf.update();
 conf.draw();
 })
}

function Confetti () {
 //construct confetti
 const colours = ['#fde132', '#009bde', '#ff6b00'];

 this.x = Math.round(Math.random(10) * w);
 this.y = Math.round(Math.random(10) * h)-(h/2);
 this.rotation = Math.random(10)*360;

 const size = Math.random(10)*(w/60);
 this.size = size < 15 ? 15 : size;

 this.color = colours[Math.round(Math.random(colours.length)*10-1)]

 this.speed = this.size/7;

 this.opacity = Math.random(10);

 this.shiftDirection = Math.random(10) > 0.5 ? 1 : -1;
}

Confetti.prototype.border = function() {
 if (this.y >= h) {
 this.y = h;
 }
}

Confetti.prototype.update = function() {
 this.y += this.speed;

 if (this.y <= h) {
 this.x += this.shiftDirection/5;
 this.rotation += this.shiftDirection*this.speed/100;
 }

 this.border();
};

Confetti.prototype.draw = function() {
 ctx.beginPath();
 ctx.arc(this.x, this.y, this.size, this.rotation, this.rotation+(Math.PI/2));
 ctx.lineTo(this.x, this.y);
 ctx.closePath();
 ctx.globalAlpha = this.opacity;
 ctx.fillStyle = this.color;
 ctx.fill();
};

const ctx = canvasEl.getContext('2d');
const confNum = Math.floor(w / 5);
const confs = new Array(confNum).fill().map(_ => new Confetti());

loop();
</script>
and..
Here’s the code for small square shaped confetti
Same thing. Copy paste the following into a code module.
<canvas id="canvas"></canvas>
<style>
canvas {
 position: absolute;
 top: 0;
 left: 0;
 width: 100%;
}
</style>
<script>
const canvasEl = document.querySelector('#canvas');

const w = canvasEl.width = window.innerWidth;
const h = canvasEl.height = window.innerHeight * 2;

function loop() {
 requestAnimationFrame(loop);
 ctx.clearRect(0,0,w,h);

 confs.forEach((conf) => {
 conf.update();
 conf.draw();
 })
}

function Confetti () {
 //construct confetti
 const colours = ['#fde132', '#009bde', '#ff6b00'];

 this.x = Math.round(Math.random(10) * w);
 this.y = Math.round(Math.random(10) * h)-(h/2);
 this.rotation = Math.random(10)*360;

 const size = Math.random(10)*(w/60);
 this.size = size < 15 ? 15 : size;

 this.color = colours[Math.round(Math.random(colours.length)*10-1)]

 this.speed = this.size/7;

 this.opacity = Math.random(10);

 this.shiftDirection = Math.random(10) > 0.5 ? 1 : -1;
}

Confetti.prototype.border = function() {
 if (this.y >= h) {
 this.y = h;
 }
}

Confetti.prototype.update = function() {
 this.y += this.speed;

 if (this.y <= h) {
 this.x += this.shiftDirection/5;
 this.rotation += this.shiftDirection*this.speed/100;
 }

 this.border();
};

Confetti.prototype.draw = function() {
 ctx.beginPath();
 ctx.lineWidth="8";
 ctx.moveTo(this.x, this.y + 8);
 ctx.lineTo(this.x, this.y);
 ctx.strokeStyle = this.color;
 ctx.globalAlpha = this.opacity;
 ctx.stroke();
};

const ctx = canvasEl.getContext('2d');
const confNum = Math.floor(w / 5);
const confs = new Array(confNum).fill().map(_ => new Confetti());

loop();
</script>
Now to use these snippets
As you can see inside the style tag, the canvas uses absolute positioning. This means it’ll stretch out to the size of the section (in the case of Divi).
You can read more about absolute positioning and how the top, bottom, left, right properties work here and here.
So, you can just take the whole module and adjust as you see fit.
Some easy tips:
- Put the module on the bottom of the whole page and you’ll most likely get the confetti over the whole page.
- In the first section, put the module under the header module in the full-width section.
Some customization options
You can change the colors here:
const colours = ['#fde132', '#009bde', '#ff6b00'];
The spelling “colours” is right in this context as it is a constant. (I guess the original code came from a non-American speller)
Anyways, all you need to do is change the colors to get different colored confetti.
Another tweak you might want to make is adding a background:
modify the inside of the style tag like this:
<style>
canvas {
 position: absolute;
 bottom: 0;
 left: 0;
 width: 100%;
 background: #988;
 z-index: 1;
}
</style>
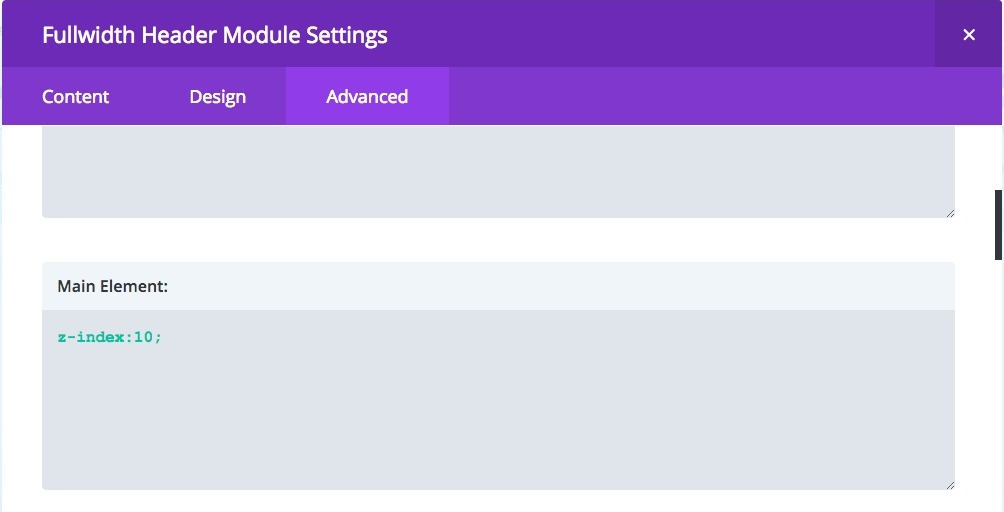
and the header module should get a z-index that is higher than 1, like this:
Coolio!
Hope this helps you set up some special pages with some oomph.
here’s the download of the modules

Original Code Source: https://codepen.io/andrewwwcollins/pen/KQeXrX
My Fork: https://codepen.io/almostinevitable/pen/yKJKQR
Photo by Brooke Lark on Unsplash


Tyler Adams says:
How could I get the code for the module, not full, to start the confetti at a specific point rather than a multiple of the view screen height?
Wendy says:
Hi PK. I noticed that when I add the code, the buttons on the page no longer work. I think it is because the “canvas” acts like an overlay and so that confetti falls on top of everything on the screen.
Do you know how I can put buttons on top of the confetti so that I can still use them?
Right now I have just moved the buttons to show below the confetti section so that they still work but it would be better to have the confetti on the entire page and for the buttons to still work.
PK says:
Hi Wendy, Could you send me a URL that I can look at so I can help?
You can email me here: http://almostinevitable.com/contact-me/
Thanks
John says:
I know this post is a bit old, but no one has shared an answer regarding preventing the canvas from blocking clicks on elements underneath such as buttons. This script has been useful to me, so here is the answer. Add the line pointer-events:none; to the styles section. That’s it. Now your buttons and other clickable elements won’t be blocked by the confetti animation canvas.
Dimi says:
Thanks for sharing this PK!
Is there a way to trigger this falling confetti after clicking a button (for example after somenone buys something in a webshop)?
PK says:
oh boy, that sounds like a great idea.
unfortunately, I’m not that good.. but I’ll have to look around for a solution.
It can’t be that hard as long as the button action is detected..
I’ll have a play and let you know. Thanks
Francine says:
Excellent! Looking forward to try this.
Thanks for sharing
PK says:
Thanks! Hope it works out well!
Collet says:
Hey PK,
Is it also possible to code for an regular dot-confetti?
Like your tutorials!
PK says:
Hi Collet, swap out the confetti part in the javascript for this:
Confetti.prototype.draw = function() {
ctx.beginPath();
ctx.arc(this.x, this.y, 5, this.rotation, this.rotation+(2 * Math.PI));
ctx.lineTo(this.x, this.y);
ctx.closePath();
ctx.globalAlpha = this.opacity;
ctx.fillStyle = this.color;
ctx.fill();
};
change the 5 if you want larger circles. 🙂
Collet says:
Wow! thank you so much. Gonna try it next week!